
Today with our lab will see how is easy to realise a Surveillance Hub Server Controller for our Cameras, as first step is to have a clear Ubuntu 16.04Lts Server installated.Let’s start from there. Our Surveillance will be composed by motion as backend and motionEye for the frontend, The project will have the frontend installed on a VM while the backend on RPI 3 with camera as showed here:
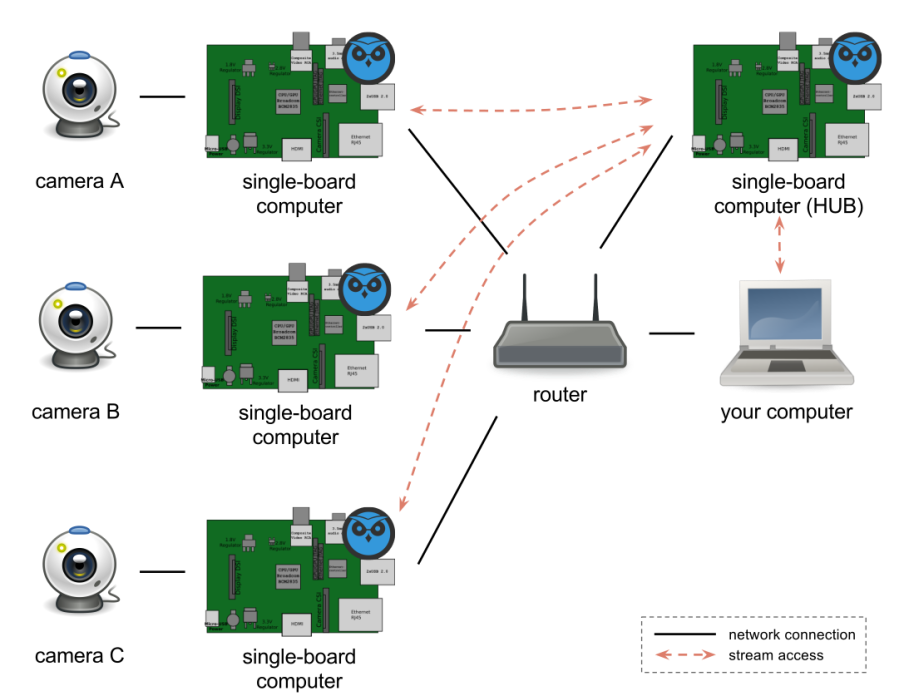
HUB CONTROLLER
1 STEP – INSTALL MOTIONEYE ON UBUNTU 16.04LTS
MotionEye is the frontend of Motion and allow us to control the camera system via web gui. To proceed with that we need to install it on our VM, of following all steps
$: sudo apt update
$: sudo apt list --upgradable
$: sudo apt dist-upgrade
then installing the requirements
$: sudo apt-get install python-pip python-dev curl libssl-dev libcurl4-openssl-dev libjpeg-dev
run the upgrade of pip
$: sudo pip install --upgrade pip
now install Motion
$: sudo apt-get install motion ffmpeg v4l-utilstake it using the link here
https://pypi.python.org/pypi/motioneye#downloads
or via command line
$: wget https://pypi.python.org/packages/02/c2/cfdadf641821f511a0fb29ab81762732ec7c84f822ff766677508af6682d/motioneye-0.35.1.tar.gz#md5=0a0182773fb178a8f7a95bf5b34b4e0b
then run that
$: export LC_ALL=C
$: sudo pip install motioneye-0.35.1.tar.gz
Processing ./motioneye-0.35.1.tar.gz
Collecting tornado>=3.1 (from motioneye===0.35.1)
  Downloading tornado-4.4.2.tar.gz (460kB)
    100% |################################|
......
......
......
You are using pip version 8.1.1, however version 9.0.1 is available.
You should consider upgrading via the 'pip install --upgrade pip' command.
2 STEP CONFIGURE MOTIONEYE
After to install that we can configure our MotionEye
$: sudo mkdir -p /etc/motioneye$: sudo cp/usr/local/share/motioneye/extra/motioneye.conf.sample /etc/motioneye/motioneye.conf$: sudo mkdir -p /var/lib/motioneye
and then
$: sudo cp /usr/local/share/motioneye/extra/motioneye.systemd-unit-local /etc/systemd/system/motioneye.service$: sudo systemctl daemon-reload $: sudo systemctl enable motioneyeCreated symlink from /etc/systemd/system/multi-user.target.wants/motioneye.service to /etc/systemd/system/motioneye.service$: sudo systemctl start motioneye
reboot the OS
$: sudo reboot
open that with our best browser using the url http://%5Byour_ip%5D:8765/

the first login is without password:
Userid: Admin
Password:
after that


Now we can pass to our single-board computer (RPI3).
VIDEO CAMERAs
1 STEP – DOWNLOAD AND INSTALL MOTIONEYEOS ON SD CARD
Using the following link we can download our MotionEyeOS image on our desktop from here, and then flash it on our SD card. The command used to write that image on SD Card are here reported:
If you use Windows, just follow these instructions.
If you use Linux or OSX, there’s a writeimage.sh script that will do everything for you, including the optional setup of a wireless network connection and setting a static IP address. Just run the script as follows (replacing the arguments with appropriate values):
$: sudo ./writeimage.sh -d /dev/disk3 -i motioneyeos-raspberrypi3-20161212.img -n 'VodafoneMobilexxxxxx:1220xxxxx'
Password:
:: writing disk image to sdcard
220+0 records in
220+0 records out
230686720 bytes transferred in 91.519016 secs (2520642 bytes/sec)
:: mounting sdcard
Unmount of all volumes on disk3 was successful
:: creating wireless configuration
:: unmounting sdcard
:: you can now remove the sdcard
then put the SD card into the RPi and boot it…Wait few minutes, since the first boot takes longer than usual. Take a note of the DHCP IP of that device because we need that to add it to Hub
VIDEO HUB CONTROLLER
After to have terminate with that it’s time to add our camera to Hub Controller. The procedure is very easy from MotionEye HubController adding the camera


“cya to the next 1…. Njoy !”
Disclaimer: All the tutorials included on this site are performed in a lab environment to simulate a real world production scenario. As everything is done to provide the most accurate steps to date, we take no responsibility if you implement any of these steps in a production environment.
“WE LEARN FROM OUR MISTAKES”
